1) Start up the installer.
2) Welcome screen
Click Next.

3) Specify File Locations screen
Name: Enter a name to identify this Oracle home.
Example: appserver
Path: Enter the full path to the destination directory. This is
the Oracle home. If the destination directory does not exist,
Oracle Universal Installer creates it.
Example: D:\oracle\appserver
Click Next.

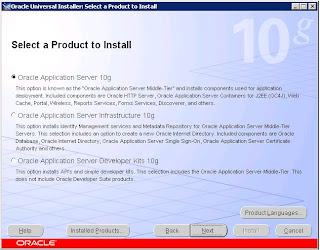
4) Select a Product to Install screen
Select Oracle Application Server 10g and click Next.

5) Select Installation Type screen
Select Business Intelligence and Forms and click Next.

6) Confirm Pre-Installation Requirements screen
Check that you meet the requirements listed on this screen,
select all the checkboxes, and click Next.

7) Select Configuration Options screen
Do not select Oracle Application Server 10g Portal
Do not select Oracle Application Server 10g Wireless
Do not select Oracle Application Server 10g Discoverer
Do not select Oracle Application Server 10g Personalization
Select Oracle Application Server 10g Reports Services
Select Oracle Application Server 10g Forms Services
Click Next.

8) Specify Port Configuration Options screen
Select Automatic and click Next.

9) Register with Oracle Internet Directory
Enter the Host name.
Example: AsServer
Enter the port:
Example: 389
Click Next.

10) Specify OID Login
Click Next.

11) Select Oracle Application Server 10g Metadata Repository
Click Next.

12) Provide Outgoing Mail Server Information
Click Next.

13) Specify Instance Name and ias_admin Password screen
Instance Name: Enter a name for this instance. Instance names can contain alphanumeric and _ (underscore) characters. If you have more than one Oracle Application Server instance on a computer, the instance names must be unique.
Example: InstanceName
ias_admin Password and Confirm Password: Enter and
confirm the password for the ias_admin user. This is the administrative user for this instance. Passwords must consist of at least five characters, and one of the characters must be a number.
Example: InstancePassword
Click Next.

14. Summary screen
Verify your selections and click Install. The installer now installs the files.
15. Configuration Assistants screen
This screen displays the progress of configuration assistants, which configure Oracle Application Server components.
16. End of Installation screen
Click Exit to quit the installer.

No comments:
Post a Comment